How to Make a DIY Paracord Dog Collar: Step-by-Step Guide With Pictures

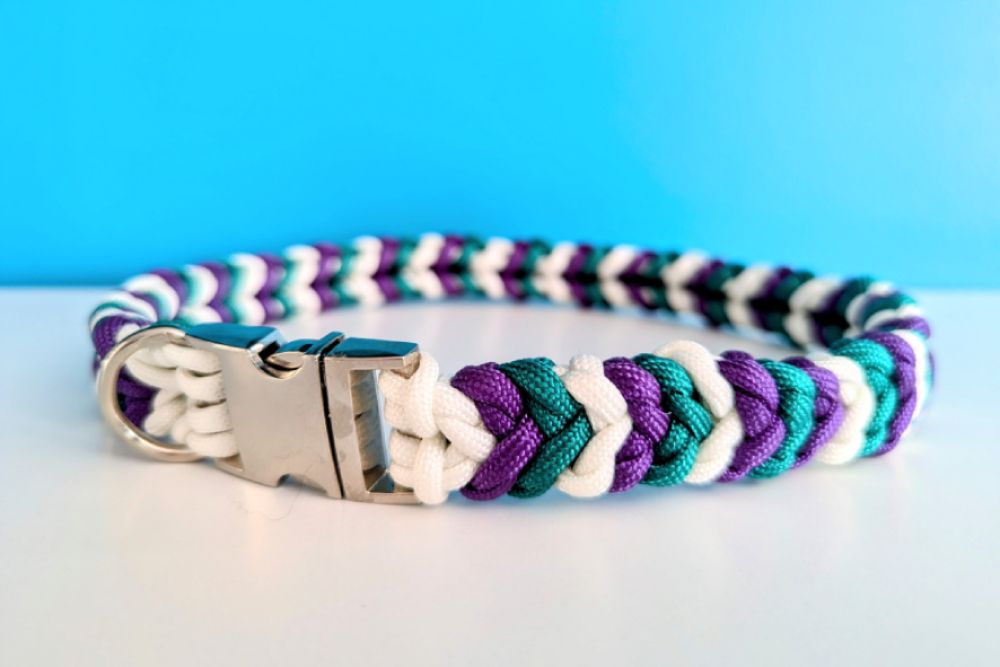
Have you seen those cool and colorful paracord collars and thought to yourself: I wonder if I could make one of those? Of course you can! And I’m going to show you how. Paracord (short for parachute cord) bracelets, keychains, dog leads, and collars are popular for two reasons: They look awesome, and you’re essentially walking around with a safety device. The cord used in these accessories consists of multiple yarns, which contain multiple threads, producing an extremely strong rope that is capable of containing or lifting people or objects. Some survival paracord even contains a thread that acts as a flammable tinder—how cool is that? If you go hiking with a paracord bracelet, you’re actually toting around an 8- to 12-foot-long rope, which could come in handy in an emergency. Most of the time, you’re not going to need to unravel your carefully constructed design, but it’s good to know that it’s there. Today, we’re going to look at how to make a three-color, snake-belly paracord dog collar with a secret safety feature. This collar looks great and is super strong but isn’t ideal for tiny necks. If you’re looking for something to suit very small dogs, check out some tutorials on how to make paracord bracelets.

What You’ll Need

1. Paracord
The range of colors available can be a little overwhelming. As a rough guide, you’ll need approximately 1 foot of each color for every 1 inch of your dog’s neck, but I will go into more detail up ahead.
2. 20-mm Side-Release Buckle
These don’t allow for an adjustable length, but they are much easier to start out with than a conventional belt buckle style. The side-release buckles come in plastic or metal. I’ve gone with the metal since it looks sharp and is safer to use with strong pullers.
3. 20-mm D-Ring
For attaching a lead and/or name tag.
4. A Tape Measure and Scissors
To measure your dog’s neck and the length of your cord.
5. A Clamp, Bulldog Clip, or Some Tape
To anchor the end of your creation as you work. If you’re committing to paracord creations, you can invest in a paracord jig to help keep your creations in place while you work. Just make sure it’s long enough to accommodate the length of the collar you will be making.
6. A Lighter
To seal the ends of your cord.
7. Pliers, Tweezers, or Hemostats
Not essential, but it will make threading the cord through the buckle at the end much easier.

How Much Paracord Do I Need?

For this design, you will have three different colors of cord. To get your cord lengths (L), measure your dog's neck at the level the collar will sit, and then add 1 inch to allow for the thickness of the collar. You want the collar to fit closely enough to not slip over their head but still with enough room to slip two to three fingers underneath.

Color 1 will attach the collar to either end of the buckle, so it needs to be longer than the other two.
- Color 1 (the color that will attach to the buckle) = L x 1 feet
- Color 2 and 3 = L x 0.85 feet
For my dog, Kodah, L = 20 (neck circumference of 19 inches + 1)
That means I will need:
When you’ve cut your cord to length, use a lighter to carefully melt and seal the ends to stop them from fraying.

The 5 Steps to Make a DIY Paracord Dog Collar
1. The Double Cow Hitch Knot
Start with color 1 (white). Find the halfway point along the cord. Fold the cord in half and push the fold through the back of the buckle and the D-ring.

Loop the cord over the top of the buckle and pull it firmly, but not too tight, as you will use this to secure the cord at the very end.


Take the end of the right strand and push it through the back of the buckle beside the original piece of cord.

Pull it almost all the way through, then push the end through the loop formed, and pull this tight.

Do the same with the other side.


2. The Second Double Cow Hitch
Thread the ends of the two strands through the front of the other piece of the buckle. I taped my measuring tape in place to make it easier to keep tabs on my length. Measure your collar length, including the buckles (e.g., mine is 20 inches).

Pull the long ends so they go through the center of the threads that run between and over the two buckle ends.

Like with the first cow hitch knot, push the end of each strand through the back of the buckle on the outer edges and thread the ends through the loops created.

Pull tightly to secure the two knots in place, double-checking your collar length is still right. We will be working from this end, and it’s time to add in some color!

3. Securing Colors 2 and 3 in Place
Find the midway point of the other two colors and place them behind the central cords.

Now this is where it gets a bit tricky, particularly when you’re dealing with very long lengths of cord! On each side, take the end of color 1 and bring it over and around colors 2, 3, and the middle white strand, then back through the loop created at the top.

Pull this firmly to secure it all in place.

4. Starting the Pattern
Much like you did in the previous step, take color 2 over and around color 3 and the central cord, coming back through the loop at the top, but don’t tighten this loop yet.

Thread color 1 from the opposite side through the loop made by color 2, and pull this tight, pushing all the knots firmly toward the buckle.


Continue in this way, making sure you are alternating your colors in the right order until you reach the other end.

Step 5. The Big Finish!
Once you approach the other end, make sure you are going to finish with color 1. With the last knot, only do the first half and pull the loops tight, like at the start. Do not pull the threads from the opposite sides through the loop.
Take the ends of color 1 and push them through the gap between the cow hitch knot on the buckle and the last knot of your collar, crossing them over as you go through.


On the underside of the collar, use your pliers to pull colors 1 and 2 through the loop made at the very beginning with our first double cow hitch knot.

Now pull/push color 3 through the same gap as the other two colors.

Cut the ends of colors 1 and 2 short (approximately 5 mm above the loop) and carefully melt the ends with the lighter. Use the flat surface of your scissors or pliers to flatten the ends over the loop before they cool completely.


The end result isn’t terribly attractive, but this side will never be on show!

The Finished Product
At the end of this (very) long process, you should have something that looks a bit like this:


And what about that secret safety feature? Just turn out the lights! The white cord glows in the dark! Perfect for keeping your dog visible after dark.

Wrapping Up
Whether you like the way paracord collars look or you’re simply wanting to keep some extra survival gear on your next hike with your dog, learning how to make your own DIY paracord collar is not only fun but a great way to ensure you have some extra safety measures in place, like adding in glow-in-the-dark features so that you can see your dog at night. If you’re a pet-loving DIYer, give this plan a shot and tell us what you think!
See Also:
Featured Image Credit: Karyn Kanowski
Expert dog care, straight to your inbox
News, insights, expert advice, and everything dog.
No spam — unsubscribe anytime.
By signing up, you agree to our Terms & Conditions and Privacy & Cookies Policy.
How useful was this post?
Click a star to rate. You can leave written feedback afterwards. (We read all feedback.)

Dr. Karyn Kanowski, BVSc MRCVS (Vet)
Dr. Karyn is originally from Queensland, Australia, and has resided in the UK for the past 10 years. She graduated from The University of Queensland School of Veterinary Science in 2010, and also holds a Bachelor’s degree in Zoology. Karyn is passionate about using experience, evidence, and working with pet owners to provide the best solutions for pets. She also believes in making reliable information about animal health accessible to everyone. 5 cats and 4 dogs let her share their home with her and her husband, and when she is not practising as a veterinary surgeon, she spends her time writing, gardening, and cleaning up pet hair!