In this article
If you adore puppies and also like to draw puppies, we have something in common. Full disclosure: I am a vet, not an artist, but I do love to draw, and my familiarity with canine anatomy and movement comes in handy when I want my artwork to at least somewhat resemble the real thing!
So, if you’re looking for a masterclass in drawing, this guide might not be quite what you’re after. But if you want to learn some basic techniques to turn your puppy artwork from cringe-worthy to fridge-worthy, you’ve come to the right place!

Before You Start
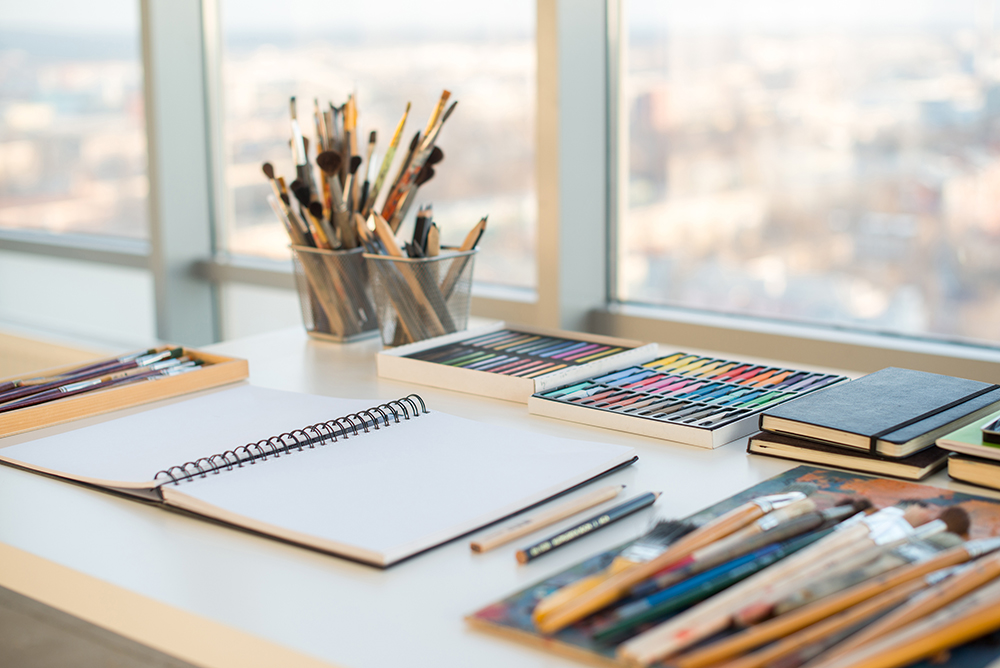
First things first: you’ll want to make sure you have everything to create your masterpiece, as well as plenty of mistakes along the way! Here’s a list of things you’ll need:

Paper
Any size, type, or color will do, but discarded printouts are great for initial sketches. As you become more confident, investing in some decent sketchbooks with good-quality paper can make all the difference. I personally prefer ones that are bound at the top rather than the side, like this one, but it’s entirely up to you.
Pencils & Sharpener
Drawing often requires pencils in a range of hardnesses, and I would suggest having at least a couple of 2H, 2B, and 4B. You don’t want the frustration of a blunt instrument, so make sure you have a sharpener too.
Eraser
A good quality eraser means less smudging.
Ruler
You might be thinking that puppies don’t have a lot of straight lines, and you’re right, but you’ll need this for marking up our proportions. Just a small one will be fine.
Colors
To begin, we’ll mostly be working in shades of gray, but it’s never too soon to invest in a good set of coloring pencils. You can pick up a basic set of color pencils, or go all out on this carrier case of 120 watercolor pencils, which are great for shading fur.
Fine Line Pen
For going over your drawing once you’re happy. A set with different sizes is great for drawing.
Inspiration
Surround yourself with your favorite puppy pictures, figures, or photos that inspire you. The problem with drawing a living, breathing subject is that they have the tendency to get bored and wander off while you’re trying to draw them, so if you have a particular puppy in mind that you’d like to immortalize in print, take lots of photos of them in different positions, with close-ups of their face.
Get Comfortable
You don’t need a studio, just a flat surface where you can spread out your supplies, good lighting, and a comfy chair. If you have some adorable real-life inspiration, be aware that they may not pose for you, but they will absolutely try to interfere with your drawing and try to eat your pencils!

A Brief Anatomy Lesson
As I’ve already mentioned, I am a vet, not an artist, so my strengths lie in understanding anatomy and function, but this can be a huge help when it comes to getting the proportions and angles looking right on your image. Whether you’re aiming to create a realistic portrait or a cute cartoon, having a grasp of how and where joints and other features should sit can make all the difference between a childish doodle and a great drawing.
The following image is a very basic sketch to give you an idea of how the anatomy and joints of puppy limbs correspond to our own. This can help you get a sense of the direction of movement each joint will be capable of. There’s nothing worse than a knee bending in the wrong direction!
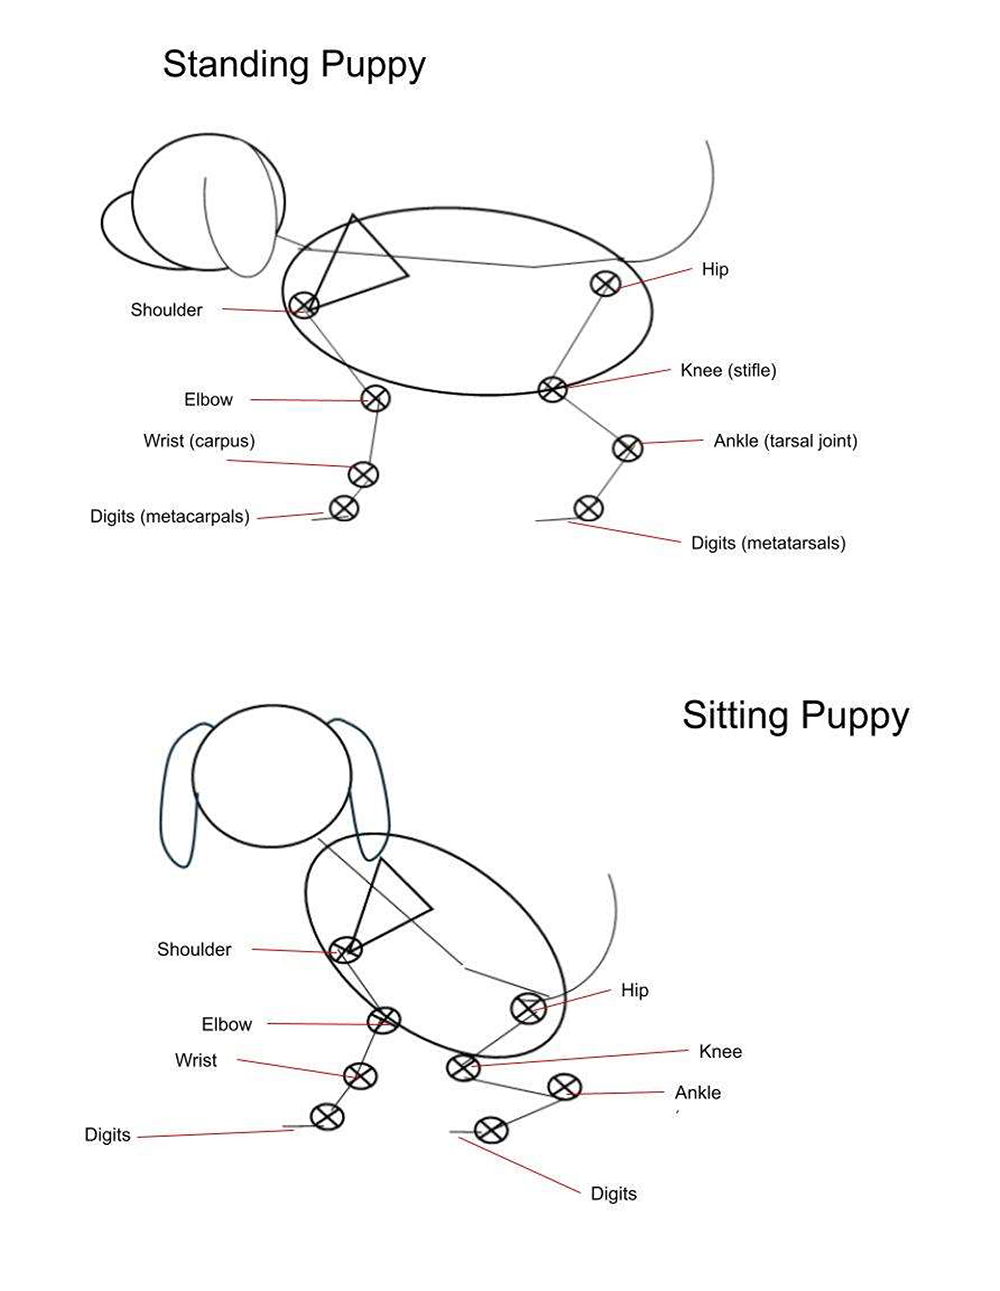
You can download the PDFs of these templates here to use as a guide until you feel more comfortable with proportions, bearing in mind that puppy proportions tend to be a bit different from those of an adult, and everything tends to be a bit rounder!
Obviously, with so many different breeds with very different shapes and sizes, it is impossible to show you how to draw them all, but once you get the hang of it, the basics are easy to change to suit whichever is your favorite!

How to Draw Dog Faces
Like the images above, these sketches can help you position your pup’s eyes, ears, nose, and mouth. One of the most common mistakes is positioning the eyes too high, so you can see how low they need to be placed. Remember that although every puppy is perfect, nothing in nature is perfectly symmetrical, and these sketches are just to help you get your proportions and placements right as you start out.

I’m using two generic face shapes, one with a longer muzzle and floppy ears, and the other with a shorter muzzle and upright ears, but again, these are just a basic guide to work from.
- Draw a circle and divide it into eight equal sections through the center.
- The eyes should roughly be level with the horizontal center line.
- Draw a line running across the top of the eyes and the inside corner of the eyes. These will give you the outer corners of the nose and the outer corner of the ears (hidden by floppy ears).
- The lines running at 45 degrees give us the top edge of the ears and the point where the muzzle hits the circle.
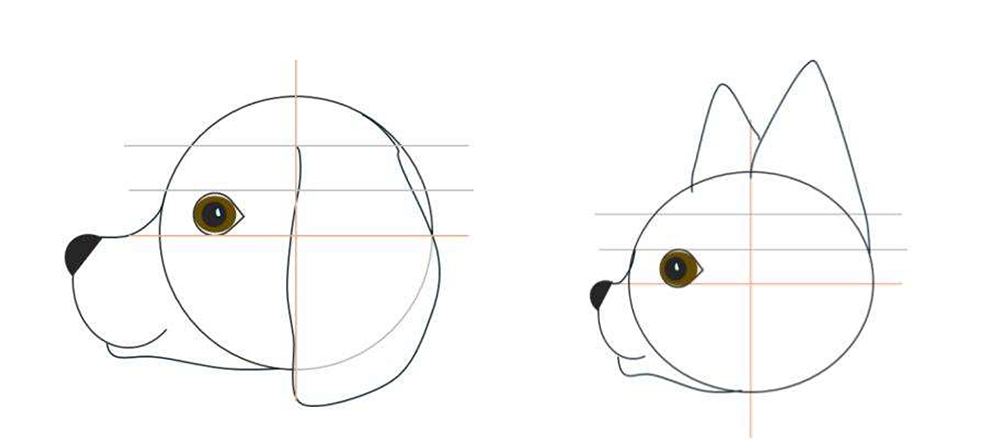
The side view will vary a lot depending on the breed, so pay close attention to the muzzle shape, size, and angle of the puppy you want to draw.
- Start with a circle or oval, depending on your puppy’s breed, and divide it into quarters, then divide the top half into thirds.
- The bottom of the eye should sit roughly between the horizontal center line and the line above, approximately halfway between the center and outer edge of the circle.
- The front edge of the floppy ear starts where the center vertical line meets the top line and ends at the top line. The upright ear starts where the center line meets the top of the circle/oval and ends at the second top line.
- The curve of the muzzle should start at the second top line and flatten out at the center horizontal line, extending out to suit your breed. The width of the muzzle will also vary, but the lower jaw should curve back to join up to the lowest point of your circle/oval.
- Don’t forget to draw the other upright ear.
So, now we have some basic templates to help guide us through some puppy anatomy, let’s get to the fun bit and put those templates to use! Below there are some basic steps to follow to draw a standing and sitting puppy, and you can follow along with the video here.

How to Draw a Standing Dog
1. The Basics – Lines & Shapes
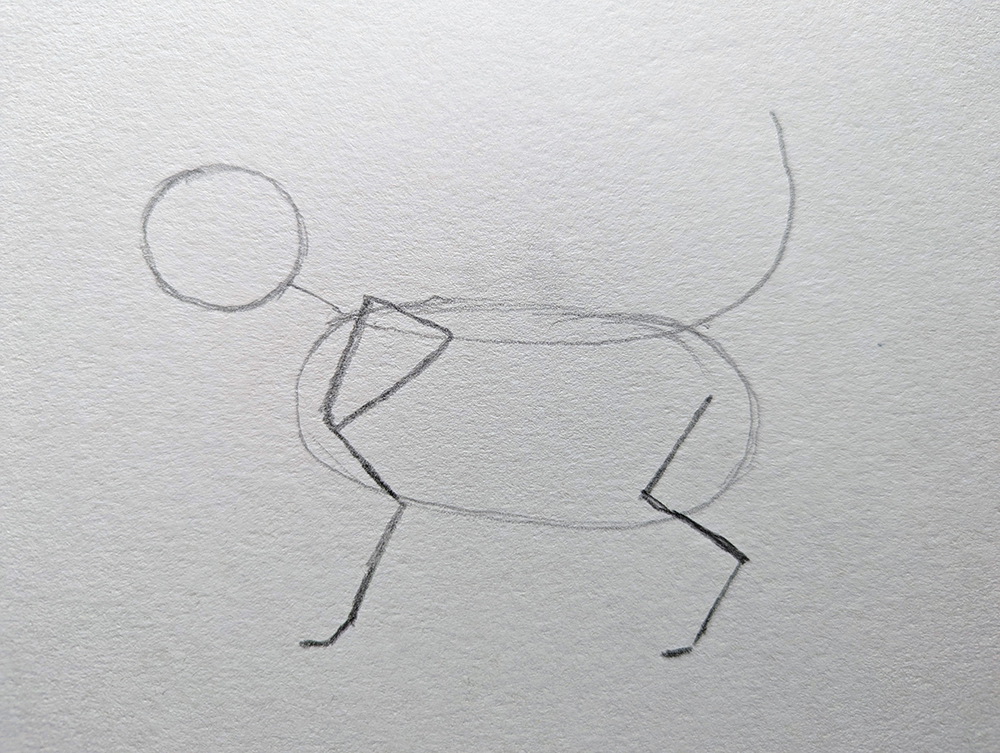
Use the template to get your basic outline and shape. The shoulder blade is an important feature for the next step, so this should sit slightly over the body shape. The hind leg should start below the line of the spine.
And don’t worry—we’re working in pencil, so we can make adjustments as we go, so don’t be too concerned if your dog looks a bit like a potato-like mine does!
2. Creating the Outline
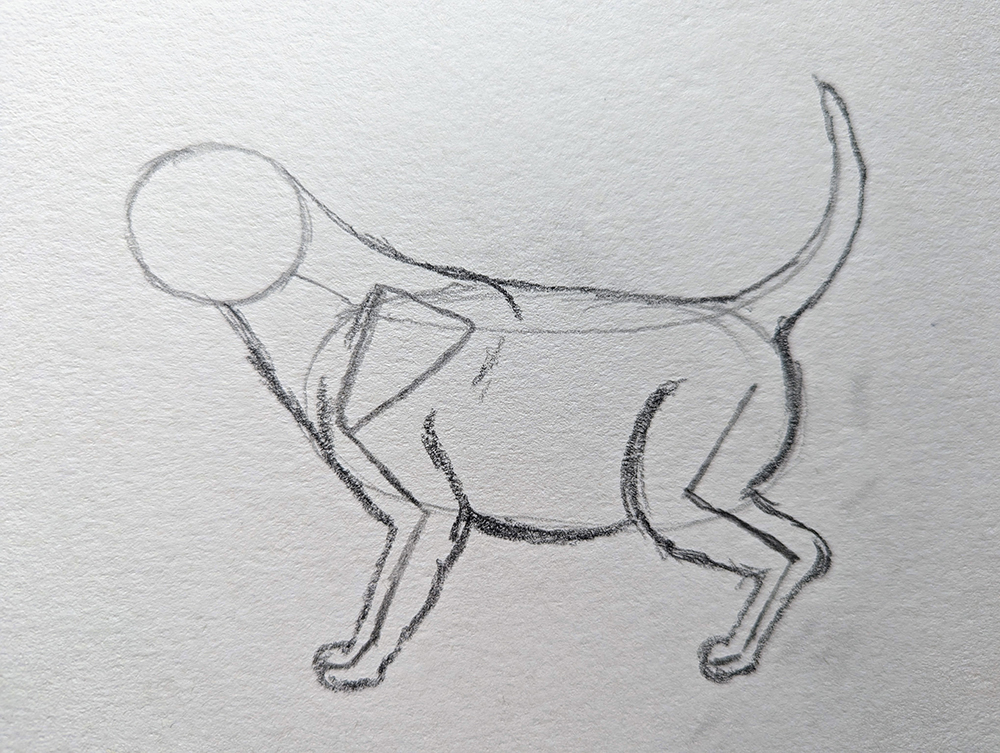
The key is to use soft, short pencil strokes rather than one continuous line. It is much easier to get your shape right by doing this, and it gives the outline a more natural appearance. Notice how the shoulder blade is featured in the outline. When drawing a puppy, we want everything to be a bit more rounded than if we were drawing an adult.
3. Adding Details
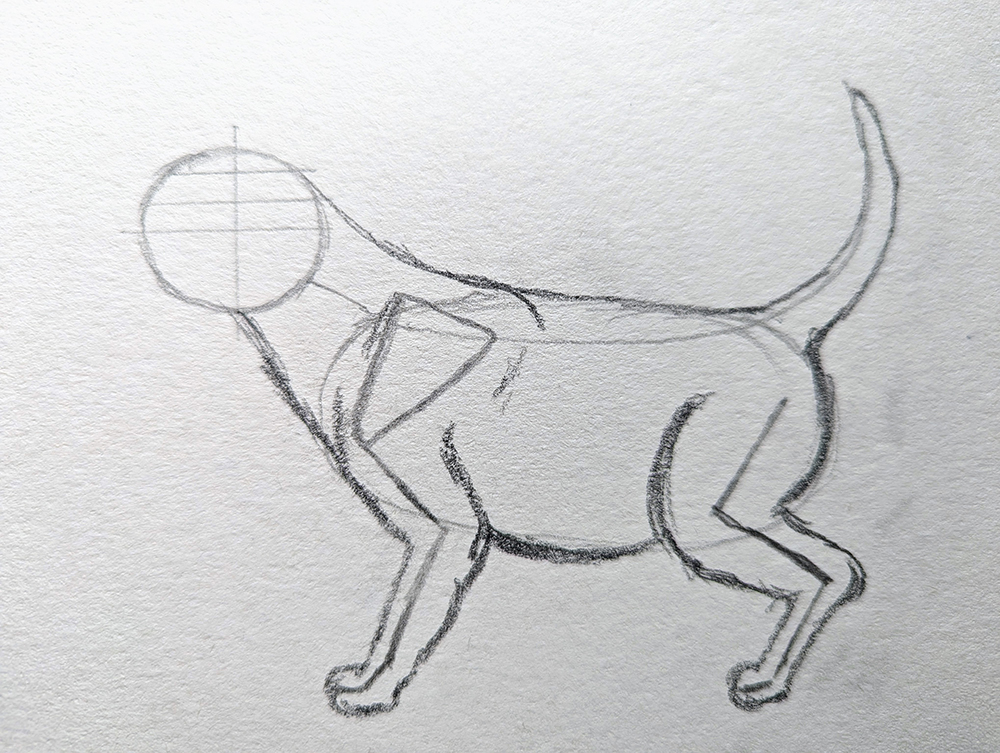
Once you’re happy with your outline, you can use your 2B pencil to make your outline stand out more. Keep using short strokes so your puppy looks soft.
Use your ruler to divide your pup’s head into quarters, then divide the top half into thirds. It doesn’t need to be precise, as this is just going to help us place our facial features.
We’ll do the side-facing head for this drawing.
4. Draw a Happy Puppy Face!
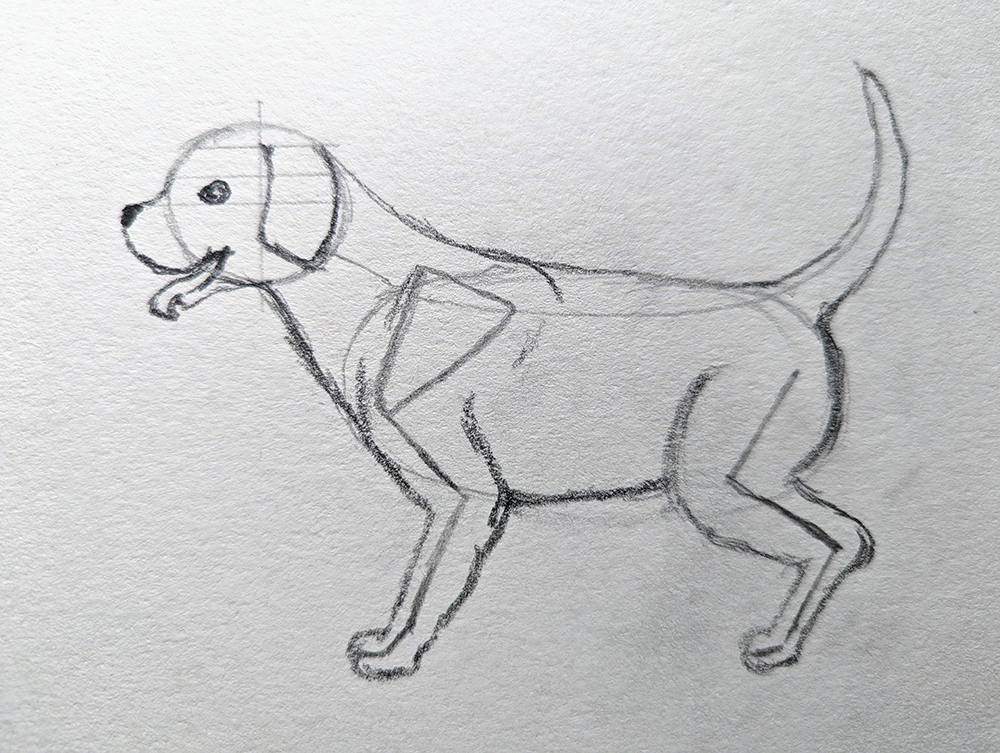
Start by drawing the eye on the middle horizontal line, approximately halfway between the center and the outside of the circle.
Our floppy ear starts where the midline meets the top horizontal line and comes back up to that top line, but your ear size and shape will vary depending on the breed you want to draw.
The top of the muzzle starts at the horizontal line above the halfway line, sloping out along the halfway line. I’ve gone with a playful open mouth, but you can also do it with a closed mouth.
5. Finishing Touches
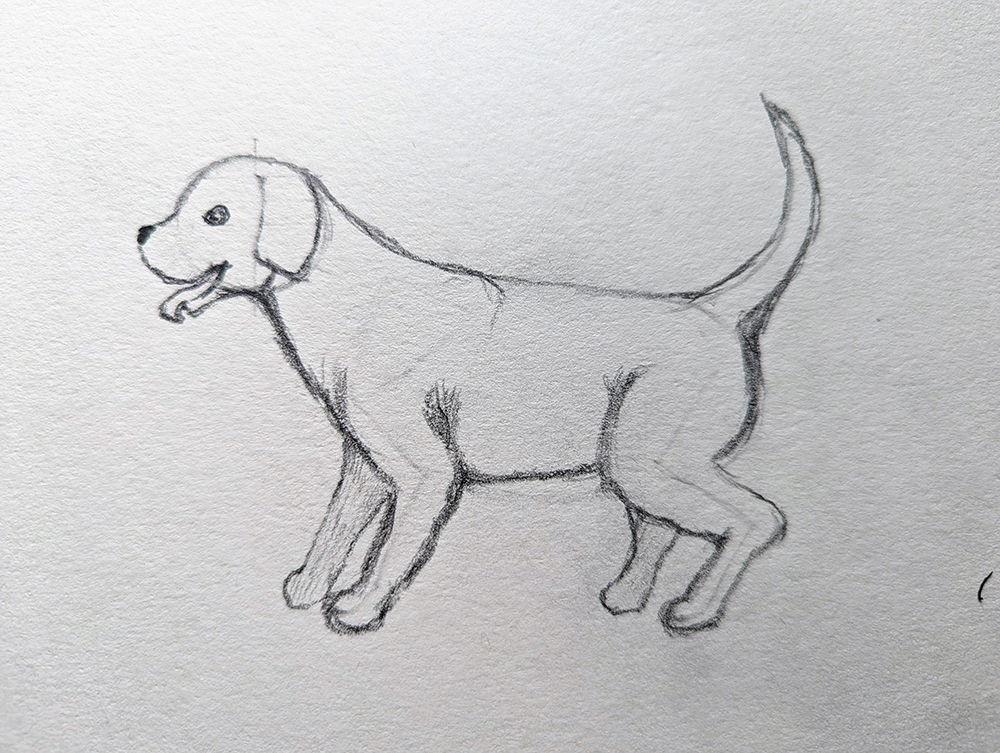
Add the other two legs by drawing them slightly in front and slightly shorter, then shade them lightly. This gives us more of a 3D appearance. You can add some color if you wish, but I’ve just left mine as a pencil drawing.
You can erase some of your guidelines now, and your 4B pencil is great for adding some shading where the legs join the body.
You won’t need to use the guidelines for long; just until you get the hang of how to position your limbs and joints and get the proportions right.
And now we’ll tackle our sitting puppy, and I think you’ll love the end result! Our steps are essentially the same, but it’s all about getting our positioning right. This time, we’ll do some upright ears on a front-facing pup.

How to Draw a Sitting Dog
1. The Basics – Lines & Shapes
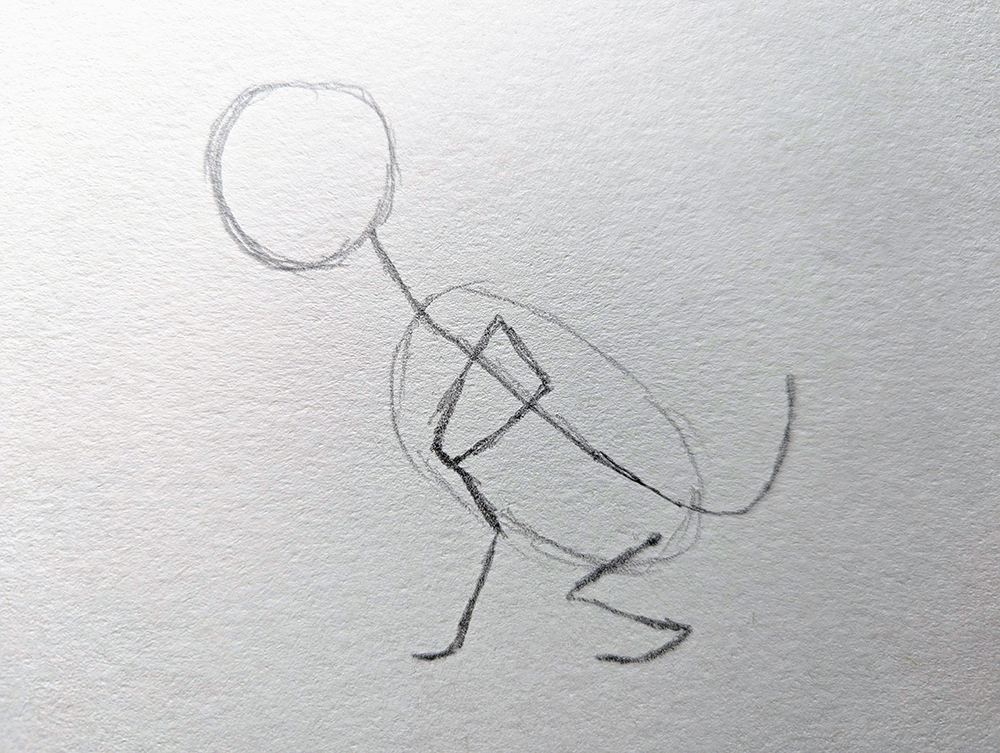
Similar to above, start by drawing the basic lines and shapes of your puppy.
2. Creating the Outline
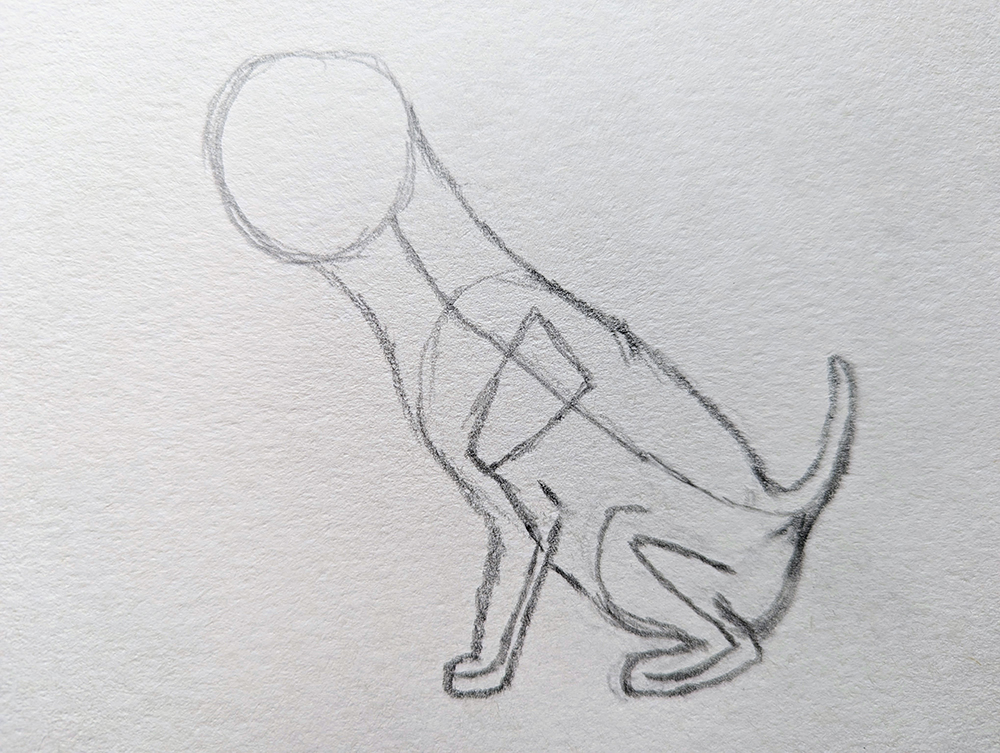
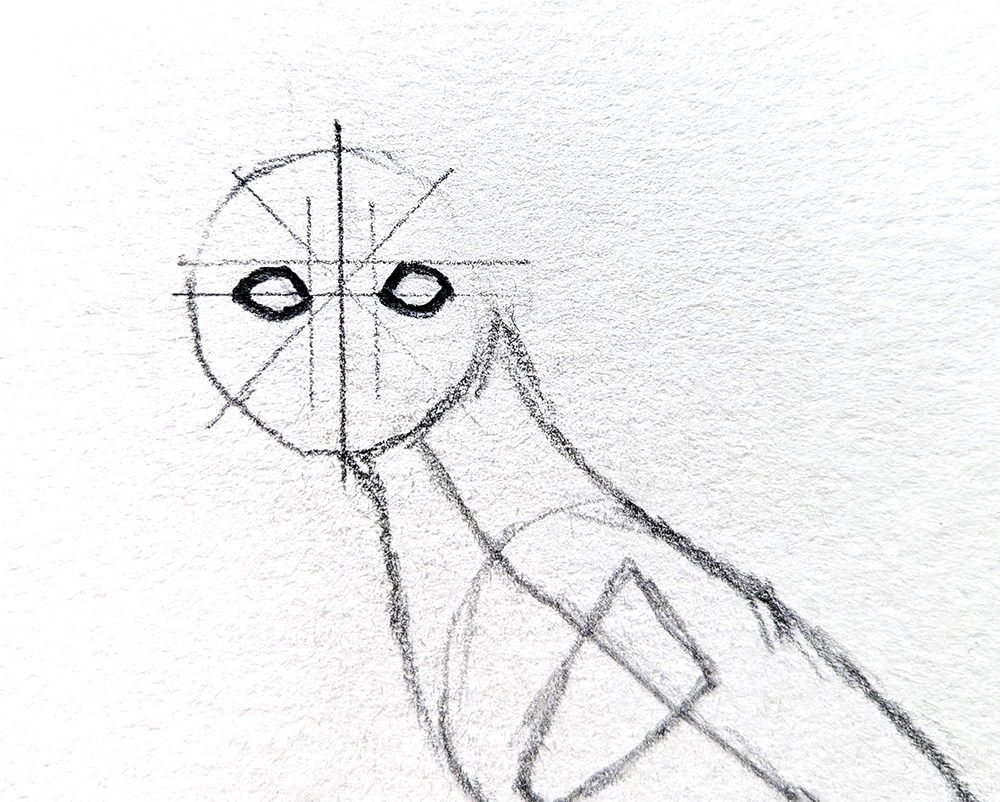
Remember from the template that the front-facing face is a bit more complex, so start by lightly dividing the circle (head) into eight equal sections.
3. Adding Details
Follow the drawing template to get your eye positioning right, and from there, you are able to line up your nose. Don’t worry that your puppy suddenly looks like Spiderman!
Nose
To draw your puppy’s nose, start with a sideways 3. Make it thicker and rounder, and use shading to create a more realistic nose.
Eyes
Eyes can seem a bit tricky, but these simple steps will make the puppy dog eyes melt your heart from the page.
Start with a circle, and surround this with an almond shape. For the pupil, draw a smaller circle, and leave a section white to give the eye some shine. Shade the iris and very lightly shade the whites in the corners, as you rarely see the bright whites of the eyes.
4. Draw a Happy Puppy Face!
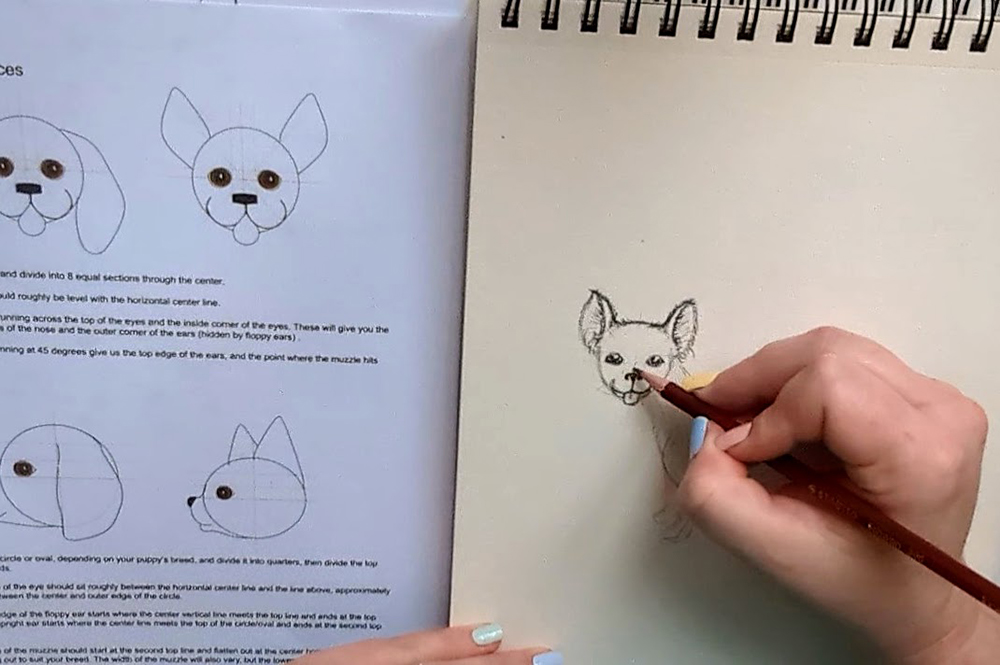
Use the lines to place some adorable ears, a boopable nose, and a smiley mouth. I’ve decided to make this a scruffy little terrier, which is easier than you might think. Use short strokes following the anatomy of the face, using the direction of the fur to help create the shape of the face. Don’t forget to add ear floof!
5. Finishing Touches
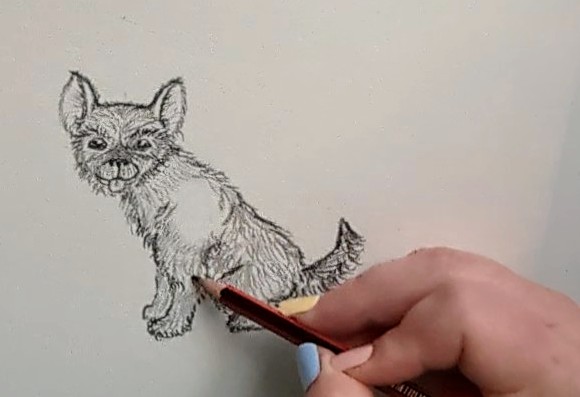
Continue using short strokes over the outline of the body, limbs, and tail, making sure to keep the direction of the fur following the shape of the body. I am particularly fond of a scruffy, swishy tail!

The Finished Product
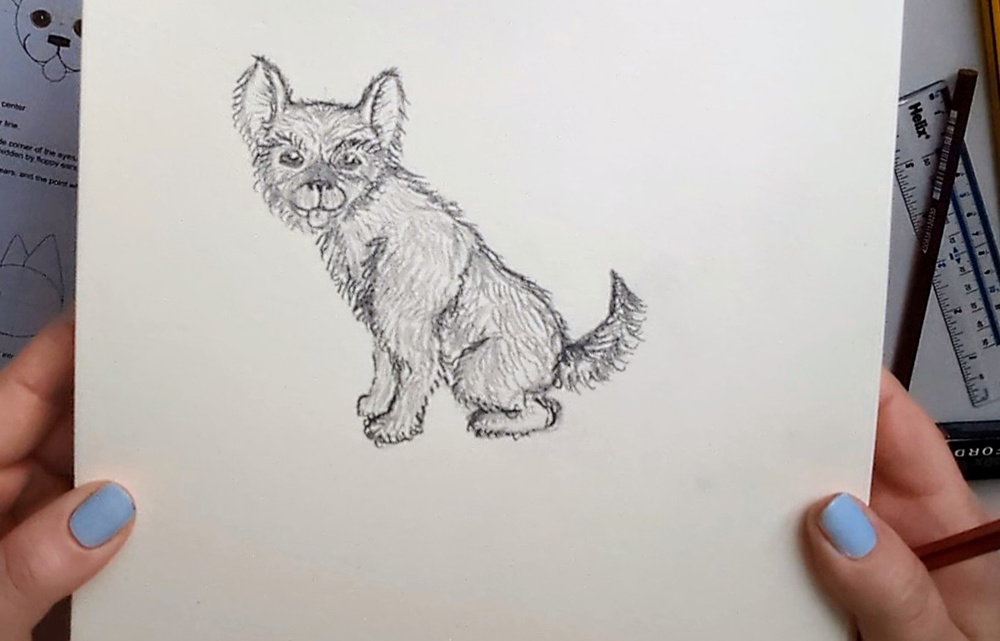
Drawing can be easy when you break it down into stages and by applying basic anatomy to your puppy’s shape and positioning. If I can do it, you can, too!
Featured Image Credit: Africa Studio, Shutterstock


