
Parachute cord, or paracord, is all the rage these days. People use it to make jewelry, lanyards, keychains, zipper pulls and — yes — even dog collars and leashes. The original point of paracord accessories was so that you would always have rope on hand if you needed it for an outdoors survival situation, but this fashion-forward trend is taking off even among home-bodies.
If you’re old enough to remember the macrame fad of the ’70s or even the hemp bracelet fad of the ’90s, the simple knots used to create these items will come back to you in a flash. If you’re one of the few who didn’t get caught in either of those fads, you’re in luck: I’m going to teach you how to make your very own custom paracord dog collar. And since I’m one of the people who makes these for sale on Etsy, I’m going to give you all the insider secrets to make your best friend’s collar — no holds barred — as quickly and easily as possible.
First things first, you’ll need to measure your dog’s neck at about where you’d like his collar to sit. You can also measure his existing collar. For every inch of length, you’ll need one foot of paracord. In this tutorial, I’m using hunter green and blaze orange paracord to make a 16-inch collar. So I cut one 16-foot length of each color.
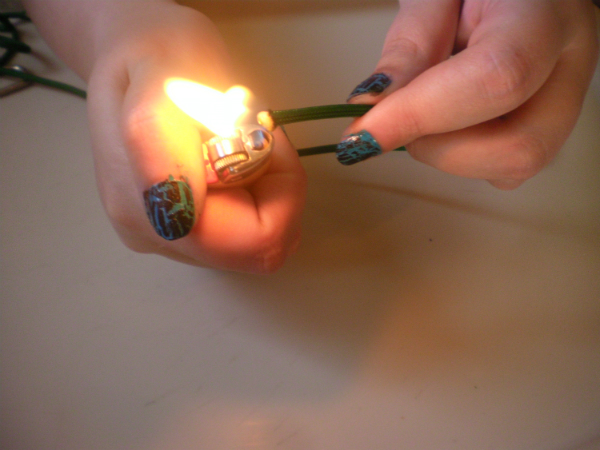
Seal off the ends of your cord with a lighter or other source of flame. Paracord is made from nylon and it WILL burn your flesh and stick to it — try to avoid that! And if you’re making this project with your kids, you’ll want to leave this part to the adults. The nylon will bead up — take the end of your lighter (or another heat-resistant implement, like a spoon) and flatten the edges of the still-burning-hot nylon against a heat-resistant surface (such as your kitchen sink or your work table.) The reason for flattening it will become clear later.
Now it starts to get a little tricky: You’ll need to secure your cord to your buckle so you can begin working. Plastic slide buckles are readily and cheaply available, but don’t provide as much security as a metal buckle does. The choice is yours, but for heavy pullers and those who are rough on their collars I would recommend going with a metal slide buckle.
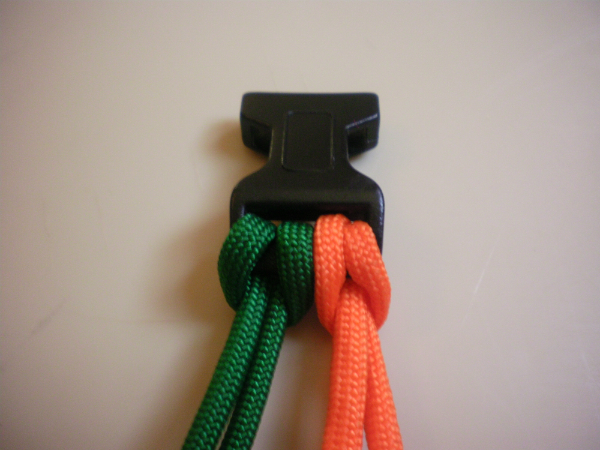
You’re going to make a slip knot around the female part of the buckle (I know it’s a bit of an antiquated metaphor, but it’s the simplest way to describe the parts of the buckle. Sorry for any offense!). When you make your slip knot, you want one end of each color to be approximately the length of your collar plus two to three inches extra. This forms the core of the collar and will lie on the inside of the braid.
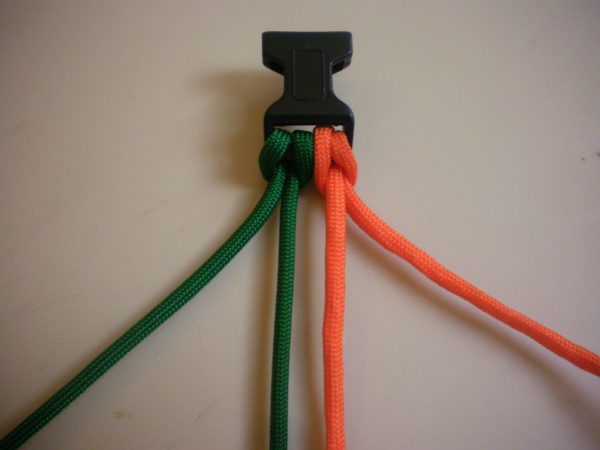
The rest of the cord will fall to the outside and become your braiding cord — the extra length is needed because the braiding eats up length at an astounding rate. You can measure or eyeball it, but always err on the side of “more is more” — you’ll have plenty of cord leftover when you’re done either way, but adding more length if you run out is beyond the scope of this tutorial (though it can be done!)
Clear as mud? Good. Now comes the actual braiding. You’ll be forming what’s known as the cobra weave, or Solomon’s bar, knot. It looks tricky and can be a little tough to master at first, but once your hands get the hang of it, it’s smooth sailing.
Treat the center two cords as one “bar” — these never move and never get worked with. They’re there to stabilize the core of the collar and give you something to weave around. The cord that falls to the left (as you’re looking at it) will form your interior color. The cord that falls to the right (as you’re looking at it) will form your border color.
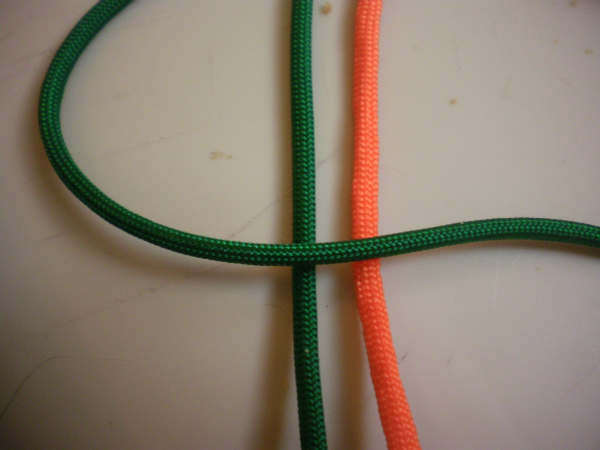
Take your left-hand outer cord (from here on out known as the “interior cord” for the sake of simplicity — this is green in my example photos) and weave it OVER the center bar cords and UNDER the right-hand outer cord (from here on out known as the “border cord” — blaze orange in the example photos). Leave the knot slack for now.
Now take the border cord and weave it UNDER the center bar cords and through (or OVER) the loop made by the interior cord. Pull the knot taut. Your interior and border cords have now switched places.
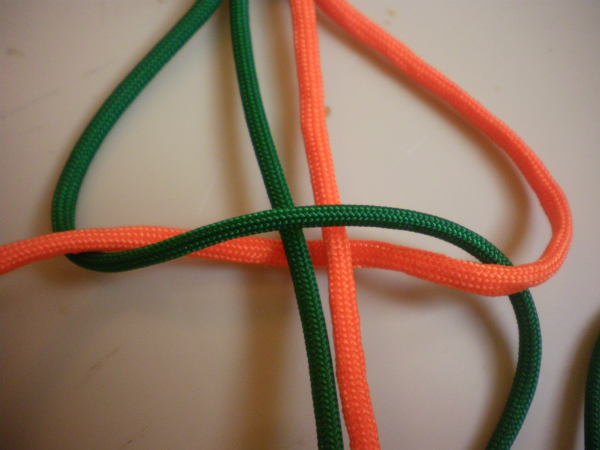
Now you’ll reverse directions to complete one full repeat of the cobra weave pattern. Grab your interior cord (now on the right-hand side as you’re looking at your project) and thread it OVER the center bar and UNDER the border cord. Leave the knot slack again.
Grab the border cord and thread it UNDER the center bar and OVER (or through) the loop made by the interior cord. Pull the knot taut and snug up your weaving. You’ve made one full repeat of the cobra weave and now your interior and border cords are back in their starting positions. I like to chant “over, under, under over” as I work — it keeps me on pattern so that I always know my border color and interior color are in the right spots.
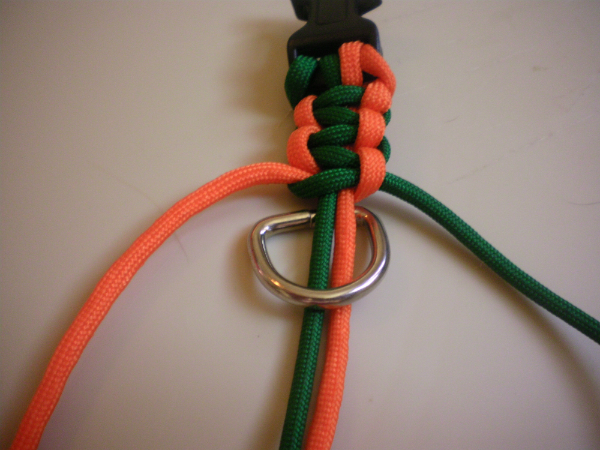
I usually weave about three repeats before sliding my D-ring onto the center bar cords. You can weave more or less, depending on where you’d like your dog’s tags and leash to sit. Just slide the ring onto the center bar cords and keep knotting around it, snugging the weaving up firmly against it as you go. If you’re making this collar for a dog who needs to avoid getting caught in the brush (say, a hunting or rescue work dog), you can always omit the D-ring.
Keep weaving until your piece (including the buckles) measures approximately the same size as your dog’s neck. So for my example collar, I wove until the piece measured about 16 inches. Again, err on the side of a little bit bigger. Paracord will shrink up a little the first time it gets wet, so any slack or unevenness in your weaving will be corrected the first bath or rainstorm the collar experiences.
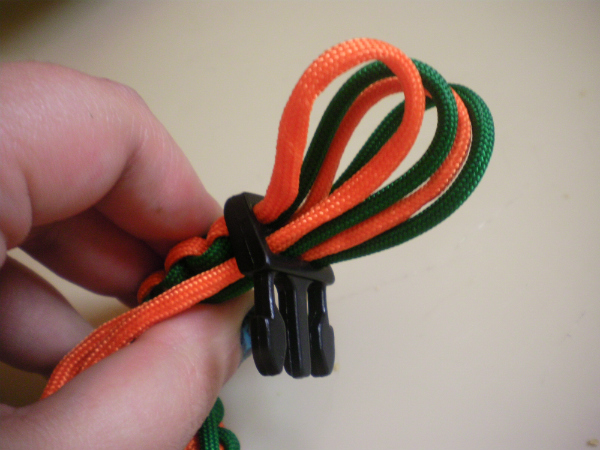
That was pretty easy, right? Get ready to say goodbye to your maincure, because you’ll need to thread all four strands through the male part of your buckle. If you didn’t listen to me earlier about flattening the ends of your cords, you’re in for a world of trouble. Thread the cords from front to back, so the excess sits at the back side of the collar. Professionals like to use a pair of forceps or hemostat clamps to do this, but if you don’t have surgical tools just laying around, consider grabbing a pair of tweezers to help you push and pull your cords.
Lift up the first two bars of the back side of your weaving (they should be the same color as the border color) and pull all four cords through. Cut the excess cord and burn the edges to seal them. While the cord is still warm and malleable, flatten them against the collar and try to get them to melt into one another at the ends. This adds security and improves comfort.
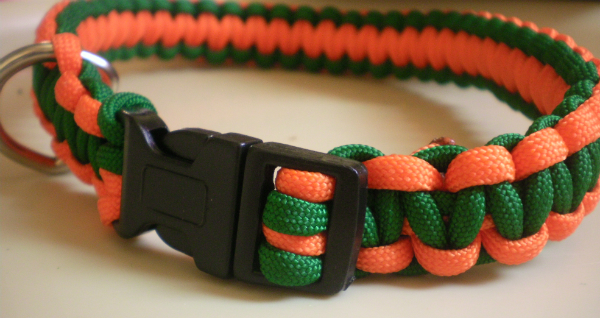
You now have a fully-formed paracord collar that you made yourself, custom fit to your dog, in your choice of colors, for a fraction of the price that they sell for in stores.
Check out these adorable stories on Dogster:
Featured Image Credit: Jelena Safronova, Shutterstock

